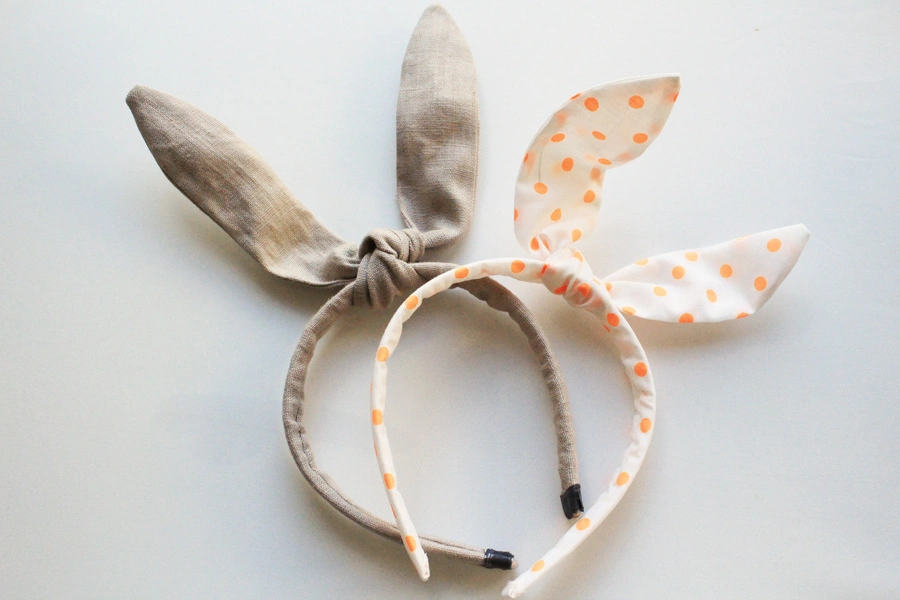
I’m not a huge fan of the fluffy bunny ear headbands that abound at Easter but these, my loves, are an entirely different kettle of fish. These I love. These transcend festive timelines and should, nay SHALT, be worn at any time of year.
The beauty of this tutorial is in the simplicity of the wire insert. No need to sew casings, thread wire delicately through small spaces; the fabric alone and the coiled wire I use is enough to get your ears perky but malleable. Not a phrase I thought I would ever write.
What you need:

- Fabric – 1/4 metre is plenty.
- Plastic headband form (1.5cm wide, 38cm around the outside arc).
- 45cm florist’s wire or other thin, malleable wire.
What to do:
1. Cut the following pieces from your fabric:
a) One rectangle 5cm x 39-40cm.
b) two rectangular pieces 5.5cm x 35cm that will end up looking like this:

2. But let’s make our headband cover first. With right sides of your fabric together, sew the first piece of fabric into a tube using a 3mm seam. I just use the narrow part of my presser foot as a guide i.e. sew keeping the left hand side of the presser foot on the outside edge of your fabric.
3. Turn the tube so that the right side is now on the outside. Turning tubes this narrow can be a bit of a pain. If you’re struggling, this is a good method. I actually have a little device I bought that helps with this process. Any good sewing shop should have one.

4. Take your two rectangular pieces and lay them right side together. Measure and mark 6cm from one end, then measure and mark 23 cm on from that.
5. From the end of your 23cm long marking, freehand some curvy bunny ears to each end of your fabric rectangle. These don’t have to be perfect (and indeed better if they’re not in my view because you show me a perfect bunny and I’ll show you…well, never mind but I will show you if you want me to) so don’t be too concerned about getting it completely even.

6. Cut out 2 of your bunny ear pattern and sew (right side together) using the same 3mm seam allowance, leaving a 5cm gap to turn your fabric right side out.
7. Once you’ve turned your ears right side out, you might like to gently press them. Or not, if you’re a rough nut like that.
8. At each end of your wire, make a rough coil like this:

When you lay your wire on your turned out bunny ears, the coils should reach about 2/3 of the way towards each end.
9. Insert wire into your ears. You will need to bend it to get it in and then manipulate it straight again once it’s inside.
10. Sew your 5cm gap closed.
11. Slip your thin fabric tube over your headband form and either glue or sew ends closed.
12. Tie on your bunny ears wherever you like ’em. If you’re a lopsided bunny-lover, the world is your oyster at this point.
Fan of the droopy ear?

I used slightly different measurements for the longer linen ears : 23 cm in the middle and 11cm at each end. Also, I had to wind two pieces of wire together so the insert was long enough.
If your headband form is a different size I think this works as a general rule for covering: measure the width, double it and then add 2cm extra which allows for wriggle room and a 3mm seam allowance.

Obviously these would look a lot better if I had actual kids to model them but since these are Easter gifts for my girls, and we are still 3 sleeps out, we will have to make do with these pics sans heads.

I’ll update the post after Easter to include photos of them being worn. If they’re worn. I’m tipping they will be. But then I’ve been wrong in the past. That one time. Just that one time.
We are staying put this Easter and I am looking forward to a quiet long weekend. Does anyone have extra-exciting plans this chocolate-gilded weekend? Please someone tell me they are egg hunting in the gardens of Raffles in Singapore or attending mass at St Peters. Whatever your plans be they modest or grand, travel safely my darlings and, if you do celebrate, Happy Easter. If you don’t, just grab the chocolate anyway yeah?

Oh my god, I LOVE these. Especially the polka dot bunny ears! They would go so well with our Auckland Easter!!
Thanks R – shall I send a pair across the ocean? xx
Super cute! Love the simplicity of them. You’re creativity is amazing!
Thanks Nancy – glad you like ’em. Happy Easter. x
Hi again – I just had a quick look at your website – nancyvaz.com – haven’t checked it out for a while. BREATHTAKING photography. Wish we were just a touch closer to Vancouver and I’d book you for a sibling session in a flash.
Your bunny ears are SOOOO cute!! I’ve got a Craft Gossip post scheduled for later this morning that links to your tutorial:
http://sewing.craftgossip.com/tutorial-bunny-ear-headband/2014/04/17/
–Anne
Thanks Anne – delighted you’ve featured them over on Craft Gossip – a site I love. xx
Pingback: Tutorial: Bunny ear headband | Sewing | CraftGossip.com
fun!
Pingback: Weekly Reader 04.18.14 | Hands Occupied
These are brilliant! One to pin for next year…
rachel xo
PS It’s been ages since I popped by. Things are looking very fancy around here! Enjoying catching up.
Thank you Rachel! It’s so lovely to hear from you again. xxx
Pingback: 19 Eggcellent Easter Activities for Kids - Hobbycraft Blog
Soooo cute bunny ears and a great tutorial, thanks for sharing!
I am putting together a sort of Easter crafts compilation blog post, with pictures of creative projects for spring. Would you mind if I shared one of your pictures? I will of course credit it to this post. I did the same thing last year if you would like a reference on how it might look: http://aliciasivert.blogspot.se/2014/04/paskpeppen-2014.html
Thank you for the inspiration!
Sincerely,
Alicia
Hi Alicia
I am very happy for your to share a picture and link. Thank you for checking with me.
Cheers
Christen.
Thank you very very much! Aaand, here’s the result:
http://aliciasivert.blogspot.se/2015/03/paskpeppen-2015.html
Happy Easter!
Pingback: bunny party inspiration | pretty plain janes
Pingback: Easter Craft Roundup - Blue Mountain Blog
Pingback: MoodBoard of The Moon: Rabbit Tutorial | LUNAdei Creativi
Pingback: WILD THINGS ears | kids clothes week blog
These are super adorable! I’m gonna be pinning this. My daughter loves bunnies so, I’m gonna make one for both of us. Thanks for the idea. 🙂