Sewing for the tropics

Back of Soph's Liberty Jumpsuit

I love saying “the tropics”.  Puts me in mind of Joseph Conrad novels and Frederic Church paintings.

As usual, I went into a frenzy of sewing clothes for the kids just prior to our recent trip to Bali. I don’t know what possesses me but it happens in the lead up to nearly every single one of our annual holidays.

Soph in jumpsuit seated

This time the urge bit me even harder than usual and I wonder whether the meditative qualities of sewing were a way for me to calm my mind in anticipation of our return after so long. Well whatever the motivation, it worked and everyone won: I felt calm (ish) and the kids got some new duds. Which, because they’re still tiny poppets, they wore not only without complaint but with some excitement. Making the most of that window.

I made countless pairs of simple shorts but the slightly more involved items this year were this jumpsuit (or romper):

Close-up Soph's Liberty jumpsuit

and these linen pants.

Soph in flat fronted white linen pants

I bought this beautiful Liberty fabric from the Liberty department store when I was in London in July. From the moment I saw it on the bolt in that venerable establishment, I envisaged a jumpsuit.

Liberty tana lawn fabric

So its fate was sealed and, luckily for me, there was an excellent tutorial for just such a suit.

This was a slightly more complicated project than I usually commit to (pleats at the front etc) but the tutorial is so good that there was only minimal swearing involved. I wish I could tell you it was under my breath.

Profanities aside, Sophia and I were delighted with the outcome.

Soph in Liberty jumpsuit

Of course, as you all probably already know, it is actually illegal to travel to the tropics without a pair of white linen pants and far be it from me to flout the immutable laws of the land.

I used a pattern for shorts that I bought from here (and highly recommend – it’s simple to make your own but this saves time and has some really gorgeous variations) to make the pants, just extending the legs myself, hoping for the best. Turned out okay, thank Gaga, as the linen was $30 per metre.

I also used this very useful tutorial to insert simple pockets into the pants, the addition of which  I found ridiculously exciting. As did my model.

Flat front white linen pants

Check out the modelling face on this one will you?

Soph in white linen pants

And here she is strutting the moss-covered catwalk.

Sophia gif 2

I do truly love a linen pant. Almost as much I love saying “pant” in the singular.

Decorating clothes with free motion sewing: a tutorial

Daisy top for Daisy

It’s been babypalooza around here. No, I have not been delivered of any more of my own (“delivered of” – love that phrase,  used most recently by Buck Palace to announce bonny Prince George’s arrival), but friends and family are popping them out all over the place.

Most recently, my darling brother-in-law and his bewdiful wife had a baby girl.

To celebrate I made her this little top using the free sewing technique I’ve talked about before when I made these napkins, and these personalised paper gift bags.

Now as you can see, this is not a neat and perfect art. By its very definition free motion sewing gives a sketchy, scribbly look which I adore but won’t be everyone’s cup of tea.

Close-up free-motion Daisy

But if it is, then that is awesome on a stick and here’s a little how-to.

What you need:

  • Garment to sew onto (duh!)
  • Free motion sewing foot
  • Eraser pen for fabric
  • Your design.

What to do:

1. Print your design onto paper and trim it down so you can slip it under your garment.

2. Trace the design using your eraser pen. If the fabric is too thick to see the pattern underneath, you may wish to use another method for transferring your design like a transfer pencil and hot iron. However be aware that not all transfer pencils wash out so make sure you use one that does.

Flower pattern

3. Fit your free motion sewing foot to your sewing machine. I have a standard Brother foot that I modified using this really excellent tutorial. You don’t have to modify your foot – just makes life a bit easier. I’m all for easier.

Modifiedf free motion sewing foot

4. Sew over your design.  Free motion sewing can take a little bit of getting used too so you might want to practise on some scraps first. Here are some good tips and here’s a video of a guy doing a free motion sewing portrait. It’s amazing but his fingers seem to go so very close to the needle it makes me shudder. No blood on the fabric – that’s my rule.

T-shirt for Daisy

You’ll notice how the fabric has puckered – especially around the flowers. That’s what happens with stretchy material and, again, I like it because it gives texture. However, if you want a flatter result, simply iron some tear-out or wash-out stabiliser behind your design before you begin.

So can you guess my niece’s name?  And no, smart arse, it’s not Roughly-Sketched Indeterminate Flower.

And I’m worried you might think they called her Carnation.

Free motion Daisy with stem

It’s a daisy, people. And so is she.

PS: Alex and Jo own and run the fabulous  and beautiful St Isidore on the NSW South Coast. The restaurant is in both the 2013 Gourmet Traveller’s Restaurant Guide and the Sydney Morning Herald Good Food Guide. Do go and give it a go if you’re in that part of the world and tell ’em I sent you. It’s a cracker.

Simple felt and fabric ipad cover: a tutorial

I love any opportunity to make something to snuggle something else within. And this ipad case is snuggly in extremis.

I hit on the idea (and it slapped me for being so presumptuous) the night before our trip to Far North Queensland last year. I’ve been using it ever since and it has held up like a trooper. I also love a pretty trooper.

Yet another thing I love is the ikat-inspired fabric.

Ikat, as I’m sure you know, is so hot right now. But did you know real ikat has been hot in Indonesia since the dawn o’ time? Did you also know we get the English word “amok” from Indonesian? As in “she saw swathes of authentic ikat  in Jakarta and very nearly ran amok”.

What you need:

  • Two pieces 3mm (1/8″) thick wool felt. Each piece measures 27cm x 22cm (10 1/2 ” x 8 3/4″)
  • 1 piece fabric measuring 25cm x 20cm (9 3/4″ x 7 3/4″) (if your fabric frays easily, you may wish to add an extra centimetre or 1/2 inch to the fabric measurements then hem your piece to end up with a rectangle 25cm x 20cm. We are going to stitch along the very edge of the fabric though so if it’s not too bad, just cut straight to size. You could also dab some Fray Stoppa or similar around the edges if you’re concerned.
  • 1 piece sturdy ribbon or twill, 60cm (approx 23 1/2″) in length and at least 2.5cm (1″) in width.
  • Elastic of a similar width to your ribbon. It needn’t be exact.

What to do:

1. Place your fabric in the middle of the sheet of felt that will be the front of your cover. Just eyeball it. Choose an overlocking-type stitch (or even just a tight zig-zag) on your machine and sew the fabric to the felt.

2. Now, leaving a seam allowance of approximately 1/2cm or 1/4″, sew your front cover to the back.

Case done!

3. Fold each end of your ribbon or twill in 2cm (3/4 “). Fold another 2cm (3/4”) so the messy ends are now effectively hidden and stitch around the square end you’ve created to make it really secure.

4. Sew your elastic to each end of the ribbon to create a loop. Make sure the elastic is slack as you sew it.

The last up-close photo shows you little bits of pilling on the felt and wear on the elastic. Bear in mind though, I have been using this baby non-stop for over 12 months and I take my ipad pretty much everywhere.

Slip your ipad in, slip the ribbon loop over to secure and sigh with contentment. Maybe stroke your pretty little trooper just a bit. Up to you.

As if you won’t.

And if I need tougher protection, I snuggle my snuggly case into this very fab protective case.

It was designed in Italy, made in China and I bought it in New Zealand. So it was well-travelled before I even met it. I love a well-travelled travel companion. This is the brand.

Let me know if you make one my loves.

Personalised packaging

I wanted a way to package the necklaces I showed you in the last post.

I am not really a great present wrapper. Presents I give tend to look like they’ve been wrapped in haste by someone with the shakes. And no eye for colour or contrast. Despite the fact they’re given with great love.

So rather than haul out the sticky tape and tissue paper and create another creased parcel with a wonky bow that not even someone who loved me could like, I came up with this.

Do give freehand sewing a try if you’re at all inclined. It’s not as tricky as it might look. You can get presser feet precisely for this kind of sewing which I HIGHLY recommend.

But in keeping with my cowboyish ways, I sew without a guard. It’s only a matter of time before there is blood splatter.

Note to self: you are risk averse in every other way, stop being so cavalier and buy a fecking freehand sewing presser foot.

Kate Spade NY, Florence Broadhurst and my cushions.

Do you remember this post from a while back where I showed you these cushions I made from some of my most precious fabric for our (then) new couch?

Well I was very chuffed to see the same wonderful Florence Broadhurst print in Kate Spade’s 2012 collection. Made me feel very fashion zeitgeisty indeed.

Here’s the print adorning various gorgeous accoutrement. I’ll take one of each, thanks.

Wouldn’t think of leaving town without this suitcase.

And finally, Florence B aside, I am loving every single thing on this stage and indeed the entire collection.

Last 4 photos from Fashionista.com which, incidentally, does a really good summary of how Florence Broadhurst’s endlessly fascinating life inspired the collection.

Yep I do without reservation loves me my FloBro. Only available here.

Clothes I’ve made for my girls (or sewing like the Lone Ranger)

When I sew twirling betty orders, I basically inspect every stitch and the ones that aren’t up to scratch are made to stand in the corner, sometimes for hours. That might sound harsh, but I am a perfectionist and if I’m doing my best, then I expect my stitches to be on board with me.

This does not, however, apply to the clothes I sew for my kids. Nope, the sewing I do for them I refer to as “cowboy sewing”. That is, it’s so rough and ready it’s practically wearing spurs.

I kind of love it. I get to sew without worrying about the perfection I insist on for my paid orders. So, in the next few shots of clothes I’ve made for the girls this summer will you see straight lines? Nah. Finished seams? Nope. Seriously, if you turned some of these garments inside out you might faint clear away from the sheer horror of tangled elastic threads and hastily sewn straps. I mean look at this (if you dare):

I know. Practically illegal.

But I LOVE making these things. And, more importantly, the girls love wearing them and that gives me a great sense of satisfaction. If I aimed for perfection with their stuff too, I’d never sew for them because I simply just don’t have the time. Because I am EXTREMELY busy and important.

So saddle up pardners. We’re in for a rough ride.

This black and white polka dot sunsuit was a nightmare to make. I actually started it 12 months ago and then abandoned it when my sewing machine, for no apparent reason, suddenly refused to shir. For those of you non-sewing types out there, shirring is when you put elastic thread in your machine and sew lines to make a stretchy panel.

I had to order a new bobbin case from Brother, then break the tension paint seal and re-set it at a tension that let me shirr. It shirr was a pain in the arse.

But it all came together beautifully in the end despite the fact I drew up the pattern for the bottom half myself. The striped neck strap was a last-minute addition when I couldn’t be fagged to make matching straps. It’s actually ready-made quilt binding.

I made this dress for Sophia

using this pattern, only instead of straps I went with the halter neck look again.

It’s very cute seeing those big bows at the back of the neck.

I used a tutorial I found on this magical interwebs for the blue dress in the photos at the start of the post but can’t for the life of me find it again now. Despite having bookmarked it. Sigh. But that’s probably just as well given the dress ended up looking like a flowery sack of potatoes.  So I did a bit of John Wayne-ing on the side seams.

The red is the original seam and the green my cavalier attempt to correct. I didn’t measure or mark (because I don’t go in for that kind of thing when I’m in the saddle) and it worked beautifully nonetheless. The lesson: eyeball it and then be brave. You can always unpick it.

And did I clean up the inside, ie snip out the excess fabric? Well that wouldn’t be very wild west now would it?

But guess what? You can’t tell.

Finally, this gorgeous fabric was a gift from my friend Dorothy. When her mother passed away, she gave me lots of fabric from her mother’s stash which I absolutely treasure. When Dorothy and John came by recently I told her I had trouble using any of her mother’s fabric because it was so very special. But in her inimitable way she told me to stop being ridiculous and just use it. So I did.

And I absolutely love it. YEEEEEEEEEEEEEHHHHAAAAAAAAAAAAAAAAAAAAAAAAAAAAAAAAAAAAAAAAAAAAAAAAAAAAA!

Fabric growth chart: a tutorial

A while back I showed you this height chart I made for Sophia and Olive and now I’m delighted to offer a tutorial for you to make your own.

What you’ll need:

  • Calico fabric. You will need to cut your rectangle to 132 cm x 30 cm, so 140cm of calico for some fudge factor is probably what I would buy. The calico needs to be heavy enough that it will fall well when it’s hung but not so heavy that it’s stiff as a board. I wish I could give you a thread count or something but I can’t. Just feel the calico between your fingers and go with your instinct.
  • Textas/felt tip pens (just normal ones are fine – they needn’t be permanent)
  • Fabric scissors
  • Wooden dowel: 2 pieces; each with a diameter of about 1cm and length of 34.5 cm
  • Something to decorate the edge of your chart. I use a jumbo roller stamp but there are plenty of other options and I discuss some of these further on in the tutorial.
  • Measuring tape or ruler
  • Embroidery needle and thread
  • Alphabet embroidery transfer or similar
  • Embroidery transfer pencil
  • Split pins
  • Paper swing tags

Instructions:

1. Cut a rectangle of calico 132cm by 30cm. Fold all 4 edges in 1 cm and iron.
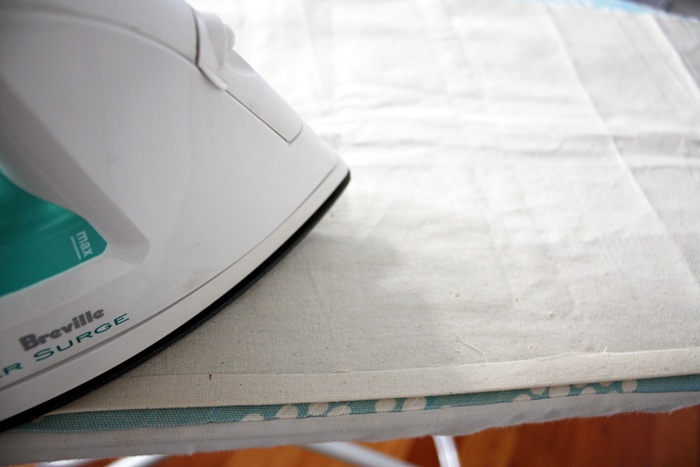
You’ll end up with this.

2. Sew around all four edges leaving a 1.4 inch seam allowance. Sorry to jump from metric to imperial measures but, you know, I’m just keeping you on your toes. Keeping your minds sharp. You’ll thank me when none of you descend into early dementure.

I just use the outside edge of the presser foot as my guide. If your needle is aligned to the left side, that’s just under 1/4 inch.  Look, frankly anything up to 1cm is fine. Unlike tarot card reading, this is not an exact science.
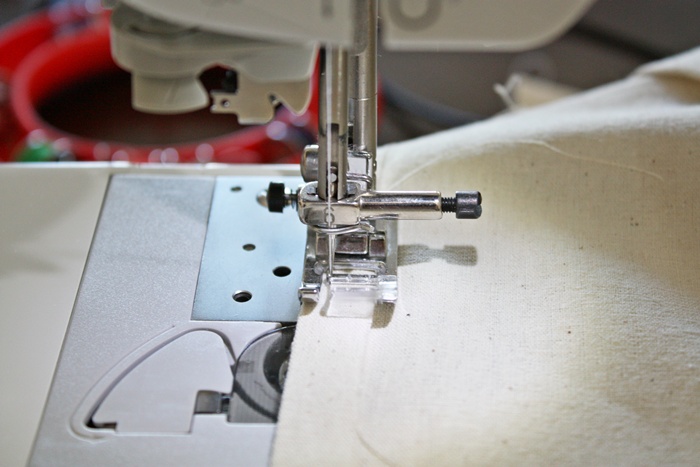
3. Fold each of the short ends of the rectangle over 3cm (1 and 1/4 inch) onto the back of the chart and sew in place to create the casing for the wooden dowel.

4. Stamp your vine on to your chart.

If you’re using a jumbo roller stamp, roll it firmly and slowly up the entire right hand side using the seam as your guide. That is, don’t stamp it right to the edge or it looks unbalanced.
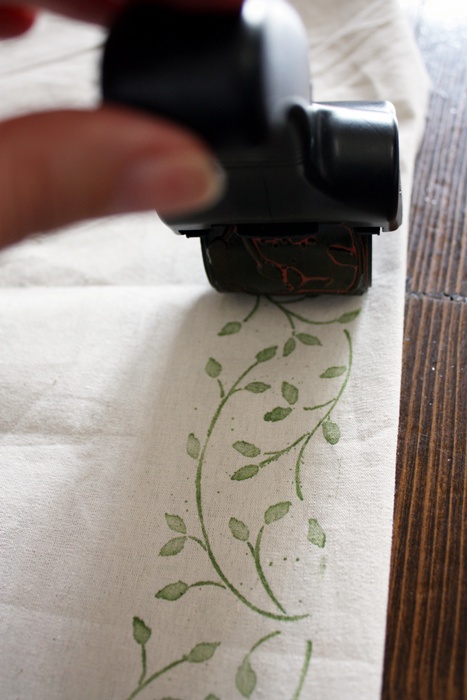
These jumbo roller stamps consist of a cylindrical stamp with a continuous print, an outer casing with a handle that the stamp itself clicks into that allows you to roll it and a little ink pad (housed inside the roller) that inks the stamp as it goes. They do, I must admit, rock.

However, when I made the first chart I didn’t have the casing or the stamp pad insert. So I just rolled it on the pad, then with a finger at either end I rolled it up one revolution, re-inked, rolled another revolution and so on. Not an elegant way to do it but it worked out fine.

For the chart you see at the end of this post, I used the roller casing. Can you spot the difference?

Now, don’t despair if you don’t have a jumbo roller stamp with  vine motif lying around (although, frankly, all the best people do). Anyway, here are some other suggestions for decorating the right hand side that are in keeping with our “growth” theme:

Buy a traditional stamp and just repeat it up the border. Make sure it is quite wide though –  5.5 cm at least – because you do want this decoration to stand out.

Flocked trim like this that was glued or gently sewed would look great. I have this trim, that I bought in a sale, in brown, black and red and think I’ll make some charts using it in the future. It’s beautifully textural.

The not-so-great thing is I can’t recall where I bought it from. This seems somewhat similar though.

Another idea would be to use fabric paint and either free hand a vine or plant design or use freezer-paper stencilling if you wanted more precision. Here’s a freezer-paper stencil tutorial I like. You can get Freezer Paper at Spotlight.

Or search for wall stencils. There are lots on ebay and in craft stores.  I think this could look great if you  used fabric paint and repeated it up the side.

Or, search for flowery, vine-y fabric like this Amy Butler fabric (especially the grey passion vine – LOVE). Or this would look amazing. Anything with a growth theme would be good really. Simply sew a decent strip (by decent I mean 5.5 centimtres or so wide) up the right hand side where the stamped vine would otherwise be.

You could even embroider a vine design which I think could look incredible if you had the patience and skill. I haven’t either though I’m afraid.

A word on ink before we go on. I used StazOn ink in Olive Green for the first chart (even though it isn’t really recommended for fabric). It worked well and didn’t bleed. On this second chart, I used a Rollagraph Ink Jumbo Cartridge in Pine Green – which is one that slips inside the roller for continuous inking.

5. Now create your embroidery transfer. I used one of the alphabet templates provided in the back of the Sublime Stitching by Jenny Hart which I also recommend for anyone keen to learn the basics of broidsing.

Using everyday baking paper and an embroidery transfer pencil, trace the names remembering (VERY important) to do it backwards so when it comes time to flip it and iron on the transfer it will appear the right way.

You can also simply create your own template on your computer. But again, remember to reverse the layout so it prints back to front because after you’ve traced it you’ll be flipping it so it irons on the right way.

Otherwise, the only flipping you’ll be doing is flipping the bird to yourself for having ironed it on the wrong way. I’m speaking from bitter experience my friends. And yes, I have flipped myself the bird on occasion.  But only when I’ve really deserved it.  Put me straight back in my place it did too.

Right, so stop trying to see if flipping yourself the bird is even possible (I so know you are trying right now) and let’s get back to biz.

6. Iron your design gently onto your chart in a spot where it looks good and, most importantly, balanced.

7. Once you’ve ironed your name or names on, you can mark the centimetres (or inches) onto the left hand longer edge of the chart using a ruler and an ordinary texta (felt tip pen).
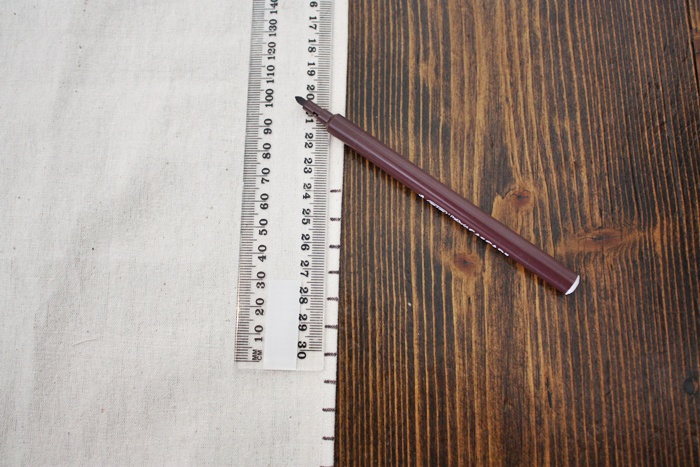
I can’t guarantee that these marks would survive a round in the washing machine but hopefully your chart wouldn’t get so dirty that it would ever need a wash.

If you’re concerned, you might like to track down a more permanent fabric pen to make your marks. I don’t recommend Sharpies though. They bleed. So do test anything you use first.

8. Stamp numbers every 10 increments. I used StazOn ink in Olive Green again. Remember, because your chart will hang a certain distance off the floor, the numbers on your chart are going to start around 50cm or 60cm (which are the centimetres that presumably your child has already [selfishly] grown) . The dimensions of this chart allow you to have from 60cm to almost 170cm  because I think 50cm from the very bottom of the chart  to the floor just looks right when it’s hung.
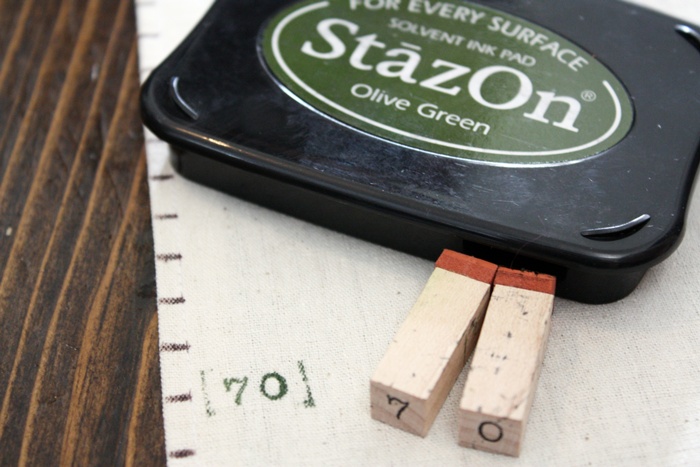
You will also see that I stopped my numbers at 160cm although my increments go to almost 170cm so that I didn’t crowd the embroidery.

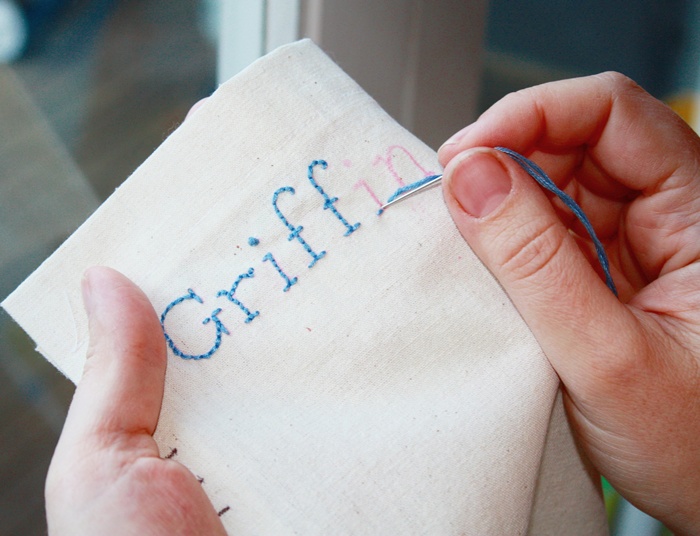
9. Embroider the names on. For this chart I used all 5 strands of broids floss to get a nice, clear effect. A darker colour would require fewer strands of floss. Although this is kind of a personal preference kind of thing.
10. Thread your dowel through the casing at each end and then tie some string or ribbon to the top piece of dowel to create a “hanger”. I made a couple of notches on the dowel with a knife so the string wouldn’t slide.

11. Measure your kids. Get cross with them for growing too fast.

12. Use split pins to mark heights. You can just gently push the pins through the fabric or make a tiny slit with a craft knife if you prefer then slide the pin through.

13. Stamp or write details onto swing cards and tie around split pins.

Or you could write straight on your chart if you’re not as uptight about being neat as I am. I hate my handwriting so I tend to avoid that option.

14. Pat yourself on the back for a job well done (on your kids and the chart).
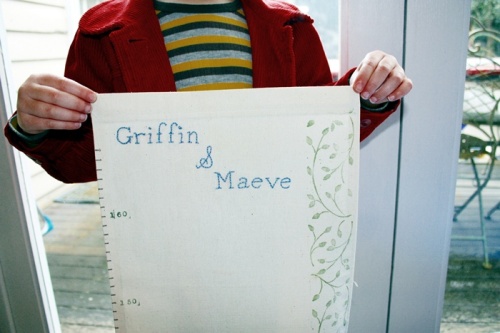
15. Shed a few tears because despite your best efforts to stunt them, your kids are still going to grow and, in the proverbial two shakes of  a lamb’s tail, they’ll be off the chart.

16. Pour large glass red wine to console yourself. Drink.

Fabric birds – the perfect newborn gift

I’ve been making so many of these little fabric birds recently to give as newborn gifts.  They’re perfect for little ones because they have no detachable bits so they’re safe for little mouths to explore, and their shape, especially the curve between the body and the tail,  makes them the perfect shape for little hands to grip. Olive loved hers when she was a tiny tot.

You can find the very simple and very clever pattern on Spool.  And look at this divine mobile on the Spool blog.

I continue to be staggered by the generosity of people on the internet and this pattern is a perfect example. As with so many of these free patterns, this one is copyrighted (by Spool, obviously) and only provided for personal use.

I like to reinforce the beaks with some extra top stitches as that bit tends to get most of the dribbly exploration.

The tail feathers are my more recent addition to the pattern.

I like to reinforce the seam holding the tail feathers in by going back and forward over it at least 4 times to make sure the ribbon loops won’t come loose.

They’re also lovely because they perch. I used to put them just above the change table so they were peering interestedly down on all the action that took place there. Olive would reach up excitedly for them and they were a great distraction when she got wriggly and things got messy.

The most recent bird went to my newest niece today.  Evie was born last Monday and we’re thrilled she’s here. And hope she likes birds.

I hope you might be inspired to try one of these birds yourself.  They’re easily handsewn and even more easily sewn on a machine. I must warn you they’re addictive to make.

Do you have any crafty go-to gifts for newborns? I’d love to hear.

An incredible addition to my fabric stash

My lovely friend Delray in Perth recently sent me the most amazing parcel.  Inside was this:

I was bowled over to say the least. Look at all that beautiful fabric. That pink seersucker with the tiny hearts nearly kills me!

What makes it even more special is that this fabric belonged to Del’s own Grandmother who ran a craft/haberdashery shop.  Her name was Betty, too.

Del isn’t really the sewing type so she sent it to me knowing I would put it to good use.

Thanks so much for sending me such treasures Del.  I think of you and your Betty every time I look over at the pile.

A polkadot sundress and retro play suit.

The day before Olive was born (10 months ago or so) I decided I needed to buy a sewing machine.  So I hauled my very pregnant self to Spotlight and soon after I had a brand spanking new sewing machine and a brand spanking new baby. I knew what to do with the latter but the former sat, untouched, for a month while I worked up the courage to turn it on.

One day I bit the bullet, read the manual and  threaded the needle.  Then I left it for another month. Finally I could put it off no longer.  Ignoring the intimidation I felt I just sat down and began to play around.

No one was more surprised than I that I could actually do it. Okay, so I didn’t sew the straightest seams, know all the technical terms or understand things like tension but I did an okay job. And before too long I had my confidence up and if a material was able to be pierced with a needle, I had a go at sewing it.

It was a few months later, talking to my mum about my new-found passion,  that I discovered that my great Grandmother was a dress-maker and milliner. Suddenly I knew where my ability (we won’t be referring to it as skill in these embryonic stages!) came from.  Now, every time I sit down at the machine I think of my great Grandmother and imagine her at hers or sitting by the fire on a cold winter’s night as she hand-sewed tiny stitches on a gown for someone. Well, I’m nothing if not romantic.

Nine months down the track I decided I was ready to tackle some summer clothes for the girls. I was also keen to try some new techniques like shirring, french seams and using bias binding.  I almost went blind trying to sew everything up in one day but I ended up with some things the girls could actually wear.

The beauty of being able to make things yourself is that you can choose colours and patterns you really like. For example, I love black on little girls (yep, must be the Melbourne in me) but it can be hard to find simple black basics and dresses.  So, I made one of Sophia’s dresses (from this gorgeous pattern)  in black and white polka dot.

I couldn’t find a pattern for the kind of old-fashioned  play suit I wanted for Olive so I adapted a couple of patterns and kind of made it up a bit as I went along and I was really pleased with the way it turned out. It really did have that retro feel to it; helped along by the apple print fabric.

Don’t look too closely or you’ll see all the wonky bits!

Do you have any favourite kids’ clothes patterns?